
Hardware
The hardware team was responsible for ensuring that the drones hardware was all working correctly and making any modifications that the software team needed for the drone’s operation. They installed new firmware, companion computer software and python packaged onto the Raspberry pi. During our first pool test we discovered that the leak sensor within the drone works as there were multiple cable penetrators that weren’t sealed and the team had to patch them up. They also added a new scanning sonar to the drone that can be seen in the image below.
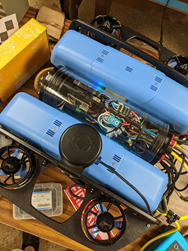
The black scanning sonar can be seen in the image of the drone above.
The hardware team also started to experiment more with how they could upgrade the hardware on the drone. This included looking at an upgrade for the Raspberry pi and the SD card. For the SD card they tested a SSD card as a replacement and while it was sinceicialy faster, it was unable to boot on the first power-up. They also looked into replacing the Raspberry pi with the Jetson nano and this is not a change that is going to be implemented in the Fall of 2021 as the software team needs more processing power.
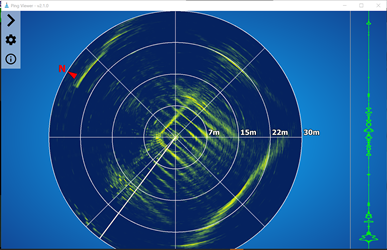
This is a screenshot of the image received from the sonar during a test in Lehigh’s swimming pool.
Software
Basics of our Software/Firmware
Programming Autonomous Operation The remote operation of the drone was done through python code that was uploaded to the drone and run after the drone was placed into the water. The code implemented the Pymavlink library in order to send commands to the drone. We were able to code commands to control the movement of the drone and the next step was to make it more automated using computer vision.
Over the summer we used openCV for image processing and to implement color, line and object detection and to calculate the distance to an object in the pool. One big accomplishment from this effort was the development of an emergency break function using openCV. Below you can see the result of this.
We also experimented with the different flight modes offered by ardusub and were controlled by QGroundControl. We chose to use the __ mode when operating it manually with a remote and __ mode when controlled by our code. We found that the __ mode made the drone start spinning, you can see this in the video below.
Simulation
An important part of the development of the code was to have a simulator to test it on before we implement it on our drone. The complete simulator was composed of three components. We used SITL to simulate the hardware without the hardware components present or plugged into your computer. BlueSim simulator was able to generate a virtual BlueROV2 heavyweight version within a virtual 3d environment. It uses the GODOT game engine to create a separate video feed where there is video from the drone’s perspective and from a 3rd person perspective and the drone could be controlled by the buttons on our computer, a game controller or code. The GUI QGroundControl that was used during the operation of the drone was also implemented in the simulator. The combination of these three simulators working in tandem allowed for a full simulation experience and for us to test our code.
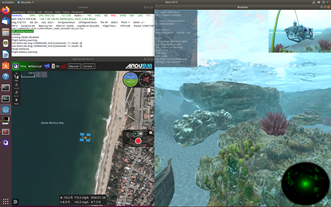
Image shows the integration of the three environments to create the full simulation. The right side shows BlueSim with the primary 1st person view while the top right corner showing a 3rd persian view and there is also the scanning sonar in the bottom right corner. The top left corner shows the console generated from SITL. The section on the left corner shows the QGroundControl interface.